Saturday, November 16, 2013

How to Make a Felt Holiday Garland

 
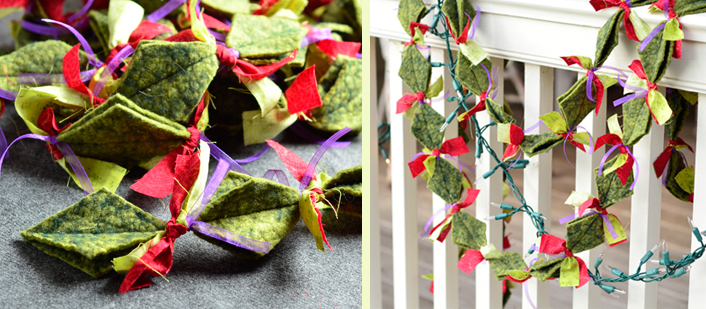
This garland is a simple sew project made from felt, fabric strips and ribbon.


Begin with cutting strips of felt 2 inches wide. Cutting these strips at an angle, you end up making diamond shape pieces. Every two pieces will give you about 3.25 inches of length toward your garland. Cut strips of fabric 1" by 5" and ribbon also in 5" lengths.
 
Place diamonds in pairs, to sew together length-wise. Sewing up to the last .25" of the diamond tip, overlap the next set of diamonds and keep sewing pairs together until you have reached your desired length. Take the strips of fabric and ribbon and tie them between each diamond set.


If you like you diamonds nice and symmetrical, you can use this template.

Friday, February 1, 2013

Christmas Card 2012


For my 2012 Christmas card I made myself an old fashion styled circus high-wire outfit. Then with the magic of Photoshop I added a backdrop to make it look like I was off the ground. After I printed out the image I strung through the print, going under my feet, a "high wire" string for a fun 3D effect. Washi and glitter tapes made for an easy way to add design elements to my card.

 On the back I found some fun circus theme fonts to use as I finished off the graphic design. The extra space gave me room to write a quick hello.


Wednesday, January 23, 2013

My handwriting - a font for you.

In graphic design I work with fonts a lot. Font styles are incredibly useful and can even say more than the actual words. There are quite a few handwriting fonts out right now and I thought it would be fun to have one too. It was back in middle school that I began paying attention to and changing up my handwriting. Mostly because I admired my friend Christie's handwriting so much, and also because I'm such a visual and artsy girl. So my font is very much "me" but now in quick type form.
 
It is named Wiggins Writing because I am known as Wiggins to several groups of friends and that named seemed fitting for my style of writing. The program I used was a free one, so there are a few issues with kerning (space proportions between letters) but I still wanted to share. Here are links to download the font for you to use too. I trust that you won't be writing any ransom notes with it :)
 
Download Here for PC
Download Here for Mac
(you have permission to use this font, however you may not sell it nor redistribute it)

Wednesday, September 12, 2012

A Watermark for my Sister's Photography

My sister has been familiar with a camera for a long time, mostly because she is completely photogenic and has always enjoyed having her picture taken. This eventually led to her being captivated with the other side of the camera as well and now she enjoys being the photographer. I especially adore her outdoor photography with clients (or with her adorable kids!). She has the skill for outdoor lighting, and more importantly, she has an eye for balance. Last year as her photography business was beginning to grow, I asked if I could design a custom watermark graphic for her pictures. It serves as both copyright and promotion. (At the time her business name was simply typed on the side of the image.) Now she can mark her photos with a fun, logo-type design element that can help promote her contemporary style. If you are in the Santa Fe, Rio Rancho, Albuquerque areas, you can find out more about setting up a photo session here at her FB page.


Tuesday, July 3, 2012

Let The 5th Graders Party


In April, a close friend emailed me that she was on her 5th grade son's (also a close friend of mine) grad party committee. She asked if I would help with a t-shirt design. There was just no way I could say "no" to that. T-shirt designs are a fun project for me... probably because it's clothing and graphics combined! Plus working on youthful graphics always makes me feel young.

At first I forgot to ask how many colors it would be printed in so I was playing in full-color. Luckily, they ended up using the colored ones for some posters and then I converted the design into two-color for the t-shirts. All the 5th graders got their own, each with the full list of their names. The school did a great job of decorating for the event and it sounded like a really fun time. I'm glad I got to be a part of a fun event for such a big moment in a kid's life =) 


Friday, June 22, 2012

Background Pattern Refresh - Freebie Tile

With Spring becoming Summer, and being inspired by a new friend’s cute blog, it was well past time to change out my black patterned background. Many of my color preferences tend to change with the seasons of the year, except for green… I always love some shade of green. I also often like a touch of texture. So with that, and my current adoration for simple repeating, trellis-like patterns, I made an image to seamlessly tile the blog background.

It is recommended that if you are going to put your own background on your blog, to keep the files size as small as possible so not to slow down the loading of your page. Repeating/tiling a small image is one of the best ways to achieve this. 

You are welcome to grab a tile for your background too! I made a few different color options.
(You may use a tile for personal use, but you may not sell or redistribute) 


Right-click on a tile to download the image then you can save it to your computer. When you find the design setting that lets you change the background on your blog, upload the image and be sure to have it set to tile image.

How to make a tile: To make the tile I first created a seamless background texture, then a repeating trellis pattern, and blended them together. Here is a general explanation of how to make a seamless background texture.

Using Photoshop I first created a texture that I liked. Unfortunately it would take longer to walk through that process. There are however many tutorials online or even free textures you can download. Basically, I kept layering several texture images and applied an image blend to each new layer (Image > Apply Image).

Although I want my final image to be rather small, I keep it large enough to work with, 300 x 360 pixels in this example. To make the texture seamlessly repeat, choose Filter > Other > Offset. The Offset needs to be set to be half the size of your image – in this case 150 x 180 pixels. My image now looks like image a.
Using the Clone Stamp Tool I blended out the seam lines, b.
Just to make sure it’s now seamless, I Offset the image again, c. You now have a seamless texture that can tile.
After I applied my repeating trellis pattern to the texture, I resized the image to a mere 100 x 120, for a nice and small 31k file.

Wednesday, January 4, 2012

How to Cut Paper Snowflakes

I was visiting some close friends in December when, after watching Elf, I thought it would be fun to cut paper snowflakes with the kids. I couldn't remember the last time I had tried but did remember that they never quite turned out like I hoped... until now! They were so fun and easy that they became the inspiration for my Christmas card this year.
There are two major steps to making paper snowflakes: folding and cutting.
F O L D I N G
This is how I fold my paper into 12 parts giving it a hexagonal shape when you’re done.
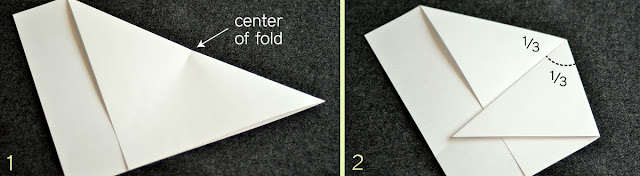
Start by folding one corner and edge up to the adjacent edge creating a triangle(1). Crease the fold to mark the center (1). Fold the triangle into thirds with the point at that center. I eye-ball it and adjust it until it is just right – a 30 degree angle (2).
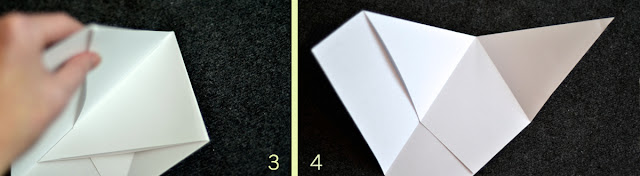
The folds are just right when I fold the other side in and it matches the same size triangle created (3). (This is where I remind you that math really is cool and helpful in everyday life =). Once I FIND THIS ANGLE I STOP and use this paper as a template to fold the rest of my papers. My papers all now look like photo #4.
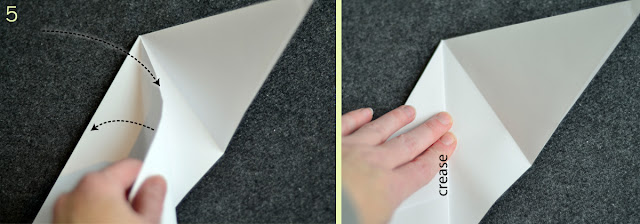
I then take each of the three triangles that were created and fold them in half (5-9). Taking the left side I fold it back inward then take the edge back to the left until it is aligned with the fold – and crease it (5).
I do this for the right side as well (6). If I open those folds back, you can see the new folds (7).
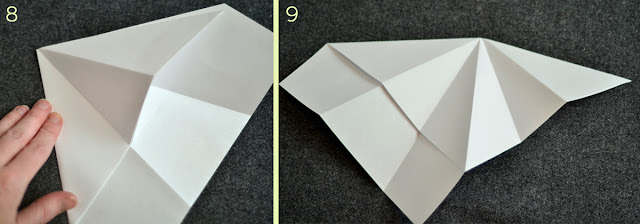
Just need to finish off by creasing the center triangle by folding the paper backwards (8). Now you have an accordion style fold (9).

Hold the folds together (10) and cut off the excess on top (11). Your paper is now ready (12) for the cutting part.


C U T T I N G
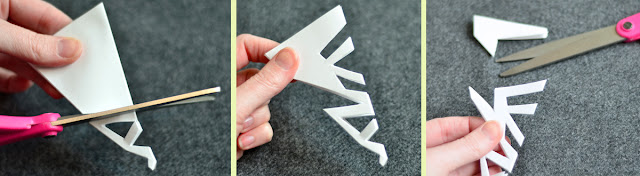
I happen to always cut the center because it will unfold and lay flat better when done. From there I cut one or two shapes on one side of the fold then flip it over and cut one to three shapes on the other side. Sometimes cut all the way over, getting close to the other edge.
The key is SIMPLE SHAPES. Almost every shape is only 2 or 3 cuts to make it! I CUT AWAY a lot of the paper, thinking more about the white part that I’m leaving then the shape I’m cutting out. I often have several shapes end near a similar spot. And remember to cut a chunk OFF THE TOP EDGE.
Here are examples of several snowflakes that are simply cut and how more detailed they become when they are unfolded.


Even just really simple triangle cuts back and forth makes for a cool snowflake. Or experiment with adding curved cuts. Enjoy!

Tuesday, December 13, 2011

My Homemade Christmas Cards

Fourteen years ago I started my production of a homemade Christmas card. It started when I was a poor college student living in a house with about 60 other people. I wished I could give everyone in the house a little gift, and if I made them smile for even just a moment knowing they got a handmade Christmas card, then that was a nice gift.

My Christmas card list only grew through the years. I love thinking about what card I will make for everyone each year, to remind people that I care about them, and to continually share the Gospel by writing about my life in Christ. I am very thankful and even blessed that I get to share my heart and creativities in this way each year.


As you can see my resources have increased over time, but since I create them in a large quantity, I can still make them on a budget.

They can be quite the production and perhaps some year I will return to the simplicity of the beginning years. But I can't really imagine that, since they have become such a joy and tradition for me each year. Moving more towards photo based cards has saved on production time. And I love coming up with a twist on a theme.


I have also made some of the outfits and props for my photos. This green jacket from last year's photo is the one I wrote of in a previous blog post.


Now I better get started on this year!! Merry Christmas!