Showing posts with label handmade. Show all posts

Thursday, February 13, 2014

Sew a Felt Bunny Finger Puppet


Here is a pattern for a bunny shaped finger puppet I made from two shades of felt.

After you cut out the pieces from felt, start by attaching all the light color pieces onto the dark ones. I used a zigzag stitch around each to secure them. Being a seamstress, I prefer to sew things together than glue them, however you could glue on the light pieces to make this step easier.

Then again using a zigzag stitch, I attached the front and back body pieces (being sure to leave the bottom open). Then sewing the paws on top of the finished body. I would recommend sewing the body pieces together instead of gluing, but you could gluing the paws onto the body.

When it comes to painting on the face, my trick for nice round eyes is to use the other side of the paint brush. Dab the end of the paint brush handle in the paint, place on the felt and gently twist. After painting on a nose and mouth, I add some of my very own blush, using a cotton swab.

And that's all there is!


Saturday, November 16, 2013

How to Make a Felt Holiday Garland

 
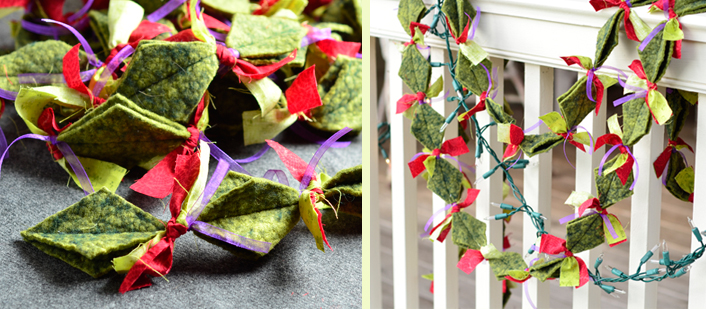
This garland is a simple sew project made from felt, fabric strips and ribbon.


Begin with cutting strips of felt 2 inches wide. Cutting these strips at an angle, you end up making diamond shape pieces. Every two pieces will give you about 3.25 inches of length toward your garland. Cut strips of fabric 1" by 5" and ribbon also in 5" lengths.
 
Place diamonds in pairs, to sew together length-wise. Sewing up to the last .25" of the diamond tip, overlap the next set of diamonds and keep sewing pairs together until you have reached your desired length. Take the strips of fabric and ribbon and tie them between each diamond set.


If you like you diamonds nice and symmetrical, you can use this template.

Wednesday, January 4, 2012

How to Cut Paper Snowflakes

I was visiting some close friends in December when, after watching Elf, I thought it would be fun to cut paper snowflakes with the kids. I couldn't remember the last time I had tried but did remember that they never quite turned out like I hoped... until now! They were so fun and easy that they became the inspiration for my Christmas card this year.
There are two major steps to making paper snowflakes: folding and cutting.
F O L D I N G
This is how I fold my paper into 12 parts giving it a hexagonal shape when you’re done.
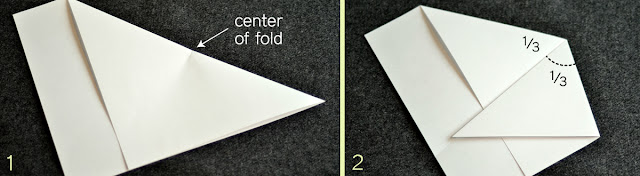
Start by folding one corner and edge up to the adjacent edge creating a triangle(1). Crease the fold to mark the center (1). Fold the triangle into thirds with the point at that center. I eye-ball it and adjust it until it is just right – a 30 degree angle (2).
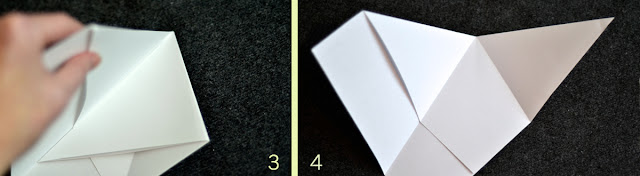
The folds are just right when I fold the other side in and it matches the same size triangle created (3). (This is where I remind you that math really is cool and helpful in everyday life =). Once I FIND THIS ANGLE I STOP and use this paper as a template to fold the rest of my papers. My papers all now look like photo #4.
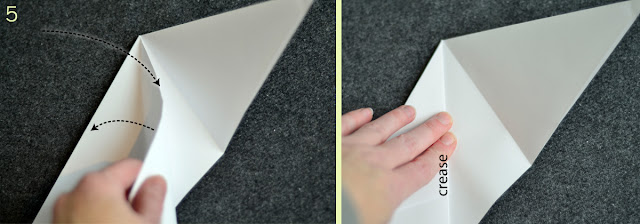
I then take each of the three triangles that were created and fold them in half (5-9). Taking the left side I fold it back inward then take the edge back to the left until it is aligned with the fold – and crease it (5).
I do this for the right side as well (6). If I open those folds back, you can see the new folds (7).
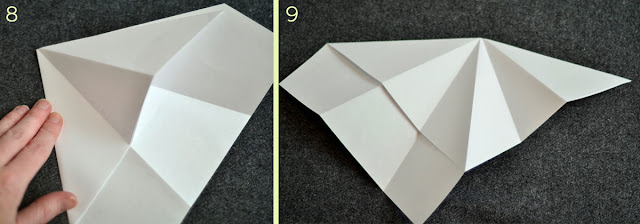
Just need to finish off by creasing the center triangle by folding the paper backwards (8). Now you have an accordion style fold (9).

Hold the folds together (10) and cut off the excess on top (11). Your paper is now ready (12) for the cutting part.


C U T T I N G
I happen to always cut the center because it will unfold and lay flat better when done. From there I cut one or two shapes on one side of the fold then flip it over and cut one to three shapes on the other side. Sometimes cut all the way over, getting close to the other edge.
The key is SIMPLE SHAPES. Almost every shape is only 2 or 3 cuts to make it! I CUT AWAY a lot of the paper, thinking more about the white part that I’m leaving then the shape I’m cutting out. I often have several shapes end near a similar spot. And remember to cut a chunk OFF THE TOP EDGE.
Here are examples of several snowflakes that are simply cut and how more detailed they become when they are unfolded.


Even just really simple triangle cuts back and forth makes for a cool snowflake. Or experiment with adding curved cuts. Enjoy!

Tuesday, December 13, 2011

My Homemade Christmas Cards

Fourteen years ago I started my production of a homemade Christmas card. It started when I was a poor college student living in a house with about 60 other people. I wished I could give everyone in the house a little gift, and if I made them smile for even just a moment knowing they got a handmade Christmas card, then that was a nice gift.

My Christmas card list only grew through the years. I love thinking about what card I will make for everyone each year, to remind people that I care about them, and to continually share the Gospel by writing about my life in Christ. I am very thankful and even blessed that I get to share my heart and creativities in this way each year.


As you can see my resources have increased over time, but since I create them in a large quantity, I can still make them on a budget.

They can be quite the production and perhaps some year I will return to the simplicity of the beginning years. But I can't really imagine that, since they have become such a joy and tradition for me each year. Moving more towards photo based cards has saved on production time. And I love coming up with a twist on a theme.


I have also made some of the outfits and props for my photos. This green jacket from last year's photo is the one I wrote of in a previous blog post.


Now I better get started on this year!! Merry Christmas!

Friday, August 26, 2011

Sweetheart of a Dress

Summer is the time of year when I am busier with sewing... and with socializing (ah, summer). I absolutely love summer for many reasons. Being able to wear skirts and dresses is definitely one of them.

In addition to my bias-cut skirts that I sell, I really wanted to add a few dress styles to my shop as well. This year I made a pattern for a retro-inspired, sweetheart neckline, strapless dress. I made a few in my size so that I could show their fit (and so I could have one for myself =). Then I offered them as a custom made dress in the customer's size and fabric request.

As with most of my patterns I make, I incorporated a comfort/ease fit. This way I can send a completed custom sized dress to a customer without them needing to have a fitting during the construction. I even got to make one for a gal in Australia and I am making some for a group of bridesmaids in Florida.

I am a big fan of pockets in dresses! (and photoshopping my head of out of the shot =).

Saturday, February 12, 2011

January Jewelry


In the fall I was invited to sell jewelry at a Gal's Night Out gathering. I hadn't made jewelry in quite some time nor had I ever really spent much creative time on it when I was making it. So I took the opportunity to explore some creativeness in making necklaces.

It was a lot of trial and error... beading and taking apart and starting over and sometimes taking apart again! Among the styles I tried my hand at some multiple strand twists but what I discovered was when I just simply braided them together around the necklace chain, I found a wonderful combination of balance, asymmetry and personality.

So this winter, with a drawer still full of beads, I began making my new favorite necklaces. I can't wait for warmer weather when I can wear my own with a tank top and capris or my favorite black linen dress.

I was able to make these available for purchase at my Etsy Boutique and soon I had a bride special order some beautiful champagne shade necklaces for her bridesmaids. It never stops feeling sweet to contribute to the festivities of a wedding!

Saturday, January 15, 2011

Angry But Cute

When it comes to Christmas gifts, I make as many as I can. This also means I am making things I've never made before nor ever imagined I would be making. The one that stuck out this Christmas was the Angry Bird stuffed animals I made for two [super fun] young boys I know. I designed them from a popular little computer game of the same name. I thought they turned out cute even though they are meant to be "angry."

Monday, December 27, 2010

Math and MaryAnne

I have a dressform I've named MarryAnne. She is most often used as my coat and scarf rack but when it comes to making patterns, she is very helpful.

There are two common forms of making a garment pattern:
Flat -- you start with a beginning basic pattern, work on a flat surface and use varied tools along with math. 
Draping -- you use a dressform to shape a pattern with large sheets of pattern paper (I use tissue paper), pins and scissors.

Since I have so much regard for math but also enjoy working three-dimensionally, I make patterns using both pattern-making forms... "Math and MarryAnne"


For my Christmas card picture this year I wanted to make a jacket. This gave me the chance to take a few pictures of the pattern process.

I didn't have the time to fully produce my pattern with lining and so I made a jacket out of wool felt. When you buy a wool blended felt and then wash it in hot water, it creates a fun marbled texture. (If you plan to wash your garments after you make it, it is very important to wash the fabric before you cut the pattern pieces =) Felt fabrics don't fray, thus leaving cuts crisp and no need to secure with sewing. That also allowed me to creatively put several seams facing outward. Luckily for me, wool felt is warm since it was 34 degrees out when we took my pictures!

I'm saving the Christmas card picture for a later post =).