Showing posts with label DIY Inspiration. Show all posts

Thursday, February 13, 2014

Sew a Felt Bunny Finger Puppet


Here is a pattern for a bunny shaped finger puppet I made from two shades of felt.

After you cut out the pieces from felt, start by attaching all the light color pieces onto the dark ones. I used a zigzag stitch around each to secure them. Being a seamstress, I prefer to sew things together than glue them, however you could glue on the light pieces to make this step easier.

Then again using a zigzag stitch, I attached the front and back body pieces (being sure to leave the bottom open). Then sewing the paws on top of the finished body. I would recommend sewing the body pieces together instead of gluing, but you could gluing the paws onto the body.

When it comes to painting on the face, my trick for nice round eyes is to use the other side of the paint brush. Dab the end of the paint brush handle in the paint, place on the felt and gently twist. After painting on a nose and mouth, I add some of my very own blush, using a cotton swab.

And that's all there is!


Saturday, November 16, 2013

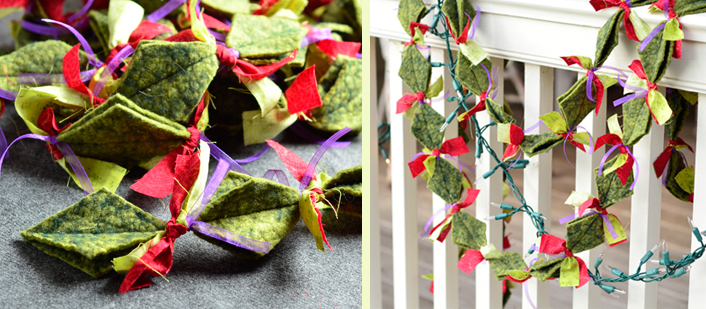
How to Make a Felt Holiday Garland

 
This garland is a simple sew project made from felt, fabric strips and ribbon.


Begin with cutting strips of felt 2 inches wide. Cutting these strips at an angle, you end up making diamond shape pieces. Every two pieces will give you about 3.25 inches of length toward your garland. Cut strips of fabric 1" by 5" and ribbon also in 5" lengths.
 
Place diamonds in pairs, to sew together length-wise. Sewing up to the last .25" of the diamond tip, overlap the next set of diamonds and keep sewing pairs together until you have reached your desired length. Take the strips of fabric and ribbon and tie them between each diamond set.


If you like you diamonds nice and symmetrical, you can use this template.

Wednesday, January 4, 2012

How to Cut Paper Snowflakes

I was visiting some close friends in December when, after watching Elf, I thought it would be fun to cut paper snowflakes with the kids. I couldn't remember the last time I had tried but did remember that they never quite turned out like I hoped... until now! They were so fun and easy that they became the inspiration for my Christmas card this year.
There are two major steps to making paper snowflakes: folding and cutting.
F O L D I N G
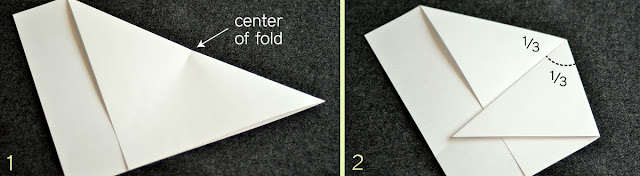
This is how I fold my paper into 12 parts giving it a hexagonal shape when you’re done.
Start by folding one corner and edge up to the adjacent edge creating a triangle(1). Crease the fold to mark the center (1). Fold the triangle into thirds with the point at that center. I eye-ball it and adjust it until it is just right – a 30 degree angle (2).
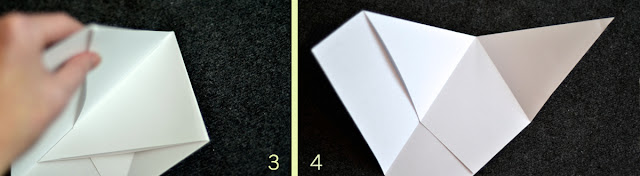
The folds are just right when I fold the other side in and it matches the same size triangle created (3). (This is where I remind you that math really is cool and helpful in everyday life =). Once I FIND THIS ANGLE I STOP and use this paper as a template to fold the rest of my papers. My papers all now look like photo #4.
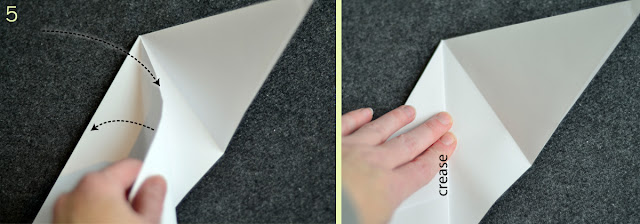
I then take each of the three triangles that were created and fold them in half (5-9). Taking the left side I fold it back inward then take the edge back to the left until it is aligned with the fold – and crease it (5).
I do this for the right side as well (6). If I open those folds back, you can see the new folds (7).
Just need to finish off by creasing the center triangle by folding the paper backwards (8). Now you have an accordion style fold (9).

Hold the folds together (10) and cut off the excess on top (11). Your paper is now ready (12) for the cutting part.


C U T T I N G
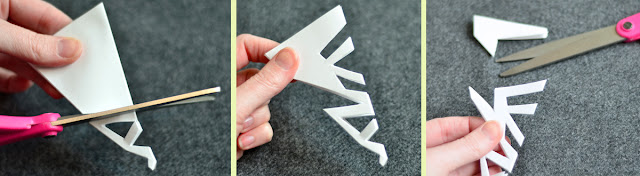
I happen to always cut the center because it will unfold and lay flat better when done. From there I cut one or two shapes on one side of the fold then flip it over and cut one to three shapes on the other side. Sometimes cut all the way over, getting close to the other edge.
The key is SIMPLE SHAPES. Almost every shape is only 2 or 3 cuts to make it! I CUT AWAY a lot of the paper, thinking more about the white part that I’m leaving then the shape I’m cutting out. I often have several shapes end near a similar spot. And remember to cut a chunk OFF THE TOP EDGE.
Here are examples of several snowflakes that are simply cut and how more detailed they become when they are unfolded.


Even just really simple triangle cuts back and forth makes for a cool snowflake. Or experiment with adding curved cuts. Enjoy!

Tuesday, December 13, 2011

My Homemade Christmas Cards

Fourteen years ago I started my production of a homemade Christmas card. It started when I was a poor college student living in a house with about 60 other people. I wished I could give everyone in the house a little gift, and if I made them smile for even just a moment knowing they got a handmade Christmas card, then that was a nice gift.

My Christmas card list only grew through the years. I love thinking about what card I will make for everyone each year, to remind people that I care about them, and to continually share the Gospel by writing about my life in Christ. I am very thankful and even blessed that I get to share my heart and creativities in this way each year.


As you can see my resources have increased over time, but since I create them in a large quantity, I can still make them on a budget.

They can be quite the production and perhaps some year I will return to the simplicity of the beginning years. But I can't really imagine that, since they have become such a joy and tradition for me each year. Moving more towards photo based cards has saved on production time. And I love coming up with a twist on a theme.


I have also made some of the outfits and props for my photos. This green jacket from last year's photo is the one I wrote of in a previous blog post.


Now I better get started on this year!! Merry Christmas!

Monday, May 23, 2011

Paper Cupcakes on Call

There are a lot of great embellishments and stickers to buy these days. I’ve realized through the years though, that the best embellishments I buy I have a harder time using – once I use it, I won’t get to use it again. That is why I like buying punches and other gadgets that let me make multiples of anything I decide to make… I can almost always make more. I have a drawer full of colorful scrap pattern papers that come in extra handy for my punches. Several months ago I decided to see if I could put together a cupcake design with the materials I had on had. Here is what I came up with.

I began with my paper crimper (which is actually a toothpaste crimper that I use on paper =). I knew this would help simulate the cupcake liner. I cut it into an angled rectangle (trapezoid) to fit the size of the cupcake top which I made from a scallop circle punch.

My “cherry on top” is from a small circle punch and heart punch. A simple and cute design that I can make over and over with different papers and color combinations.

Monday, April 25, 2011

Easter Egg Coloring

Coloring Easter eggs is such an accessible activity for almost any age and interest in creativity. Really, the most creative commitment that you have to make is which color to drop the egg into. A bowl full of simply solid colored eggs are super cute and festive. Beyond the basic color, there are many decoration kits, methods and ideas to keep the creativity flowing.
I have long preferred to color hollowed-out eggs. That way I can let them sit out on the table since they won't need to be refrigerated. To hollow an egg, create small holes on the top and bottom of an egg, stir up the insides with a toothpick and then blow the yolks and whites into a bowl. (The egg insides become especially handy to make cookies after decorating is done! )

My favorite decoration tool is a bottle of clear fingernail polish. Paint on the polish any place you want the current color to stay before placing the egg in a new color.

I actually really enjoy simple colored eggs the best and so my favorite egg ended up being the one I used the polish to leave a large heart shape on the egg.

Perhaps what I like most about Easter egg decorating is that I don't feel the need for my finished eggs to look really well done. Instead they speak more of the fun that was had in the creative process... and, well, they look really cute all in a bowl.

Saturday, March 12, 2011

Hero of Hems

I shorten quite a few pant and jean hems on a weekly basis. Most pants are sewed with a blind hem and chinos with a top stitch. Dark jeans without a wash on them are trimmed and top stitched with denim thread. But most jeans have a wash on them. It’s a process which leaves a light coloring on the hem that we are all familiar with. Unfortunately it is not easily duplicated at home and can be distinctly missing when jeans are shortened. After several washes the new hem can show signs of the similar lightening, but the best way to keep the original look is to keep the original hem. While saving hems is a common occurrence for me, trying to explain how that works and looks to someone who has never had their hems saved, can be hard to relate. Here are some pictures I took of the major steps in the process.
The hem is cut off and the extra length of denim removed. The two new edges are separately sewed with a serger to secure the threads. They are then pinned together with side seams matching up.
The zipper foot allows the stitches to get as close to the hem fold as possible. After the hem is reattached, a top stitch with matching thread keeps the new seam flat and the denim edges under the seam secured down. The result is a seam can be seen when looking closely but integrates itself and is barely noticeable from a distance. As you can see in the final picture, the hem blends back into the pant leg nicely.

Monday, January 17, 2011

How to make fabric flower hair clips

As a Christmas gift I made a few fabric flower hair clips. There are several variations of these found in the how-to nation of the internet. I made mine slightly different than the ones I looked at, mostly because I use needle and thread in my life more often than glue. My sister asked how I made the one I sent my niece, pictured in the title image. So here is my how-to.
ONE - Cut a fairly long strip of fabric, at least 36" long and about 2" wide. If you are going to make a multi-color flower, then the total length of each fabric you will use should add up to at least 36". At this length, your finished clip will be about 2" in diameter. My neice's measured closer to 2.5" which took at least 50" of fabric.

TWO - Fold the edges in towards the center and iron.

THREE - Now fold the strip in half (but DON'T iron this fold) and tie a knot on one end.
FOUR - Hold the knot securely in one hand while holding the length on fabric in the other. Begin to twist the length of fabric closest to the knot.

FIVE - Begin to wrap the fabric around the knot as you continue to twist the length of fabric. Both the twisting and the wrapping should be fairly loose. The bulk of the knot stays to the backside of the layers.

SIX - Since the wrapping around is loose, secure the layers together with pins as you go.
SEVEN - The length of fabric is done being twisted and pinned OR add on a new strip of fabric by simply leaving the raw edge behind the layers and continuing the twisting and pinning. Note that your finished flower clip will be smaller than the fabric circle is at this point in the process. So if it looks too small, it is only going to get smaller, you might want to add more layers.

EIGHT - (Backside pictured) Tuck the end of the fabric behind the layers and secure by sewing a simple knot between it and the beginning knot. If you used several fabric strips, quickly stitch all the ends together in the center.

NINE - Starting from the center knot, create a long stitch through all the outer layers. Look at the front of the flower as you go to make sure the thread is not going on top of the layers, but through each layer. Pull the thread tight and then make a long stitch back to the center knot. Continue doing this as you turn the circle, all the way around. Pulling tight on the thread will bunch up the layers of fabric and create more of a flower/petal texture. Once you stitched all the way around, tie off the thread back at the center.
TEN - Cut either felt or crafters' leather (since neither will fray) into a circle that is slightly smaller than your finished fabric flower. Choose the clip that you are going to secure to the fabric being sure that it is smaller than your flower (should I have mentioned this sooner?). I purchased a pack of clips at the craft supply store in the jewelry section that are just 1.75" long.

ELEVEN - Secure the clip to the circle with just a few stitches. Be sure to leave the thread knots on the backside of the circle.

TWELVE - Apply a good amount of glue to the backside of the circle and press onto the backside of the fabric flower. Let dry... and you're done.

I might just keep this one for myself!

Monday, December 13, 2010

How to make your own glass magnets


ONE - The most creative way to gather words for phrases is to cut up a magazine. I find though that it takes quite a bit of time to do this, so I print them out in fun fonts. However it is very important that if you print on an ink jet printer, you must copy the words off on a copier (or the words will bleed once glue is applied). Cut out the words and glue them onto small pieces of colorful paper or magazine clippings. Just make sure the pieces of paper are slightly bigger than the glass you will be using. Don't worry about being sloppy with the glue.

TWO - I use large floral glass marbles which are shaped like a disc (not a sphere). There is one side of the glass that is smoother than the other. On the less smooth side, apply a generous amount of crafters glue. I like this glue because it is thicker than average glue. Spread the glue to the edges with your finger.

THREE - Place the glue side down on the piece of paper over words. Glently press down to get out air bubbles. It is okay if glue squeezes out the sides. Be sure that you are on a flat surface or the glass will begin to slide off the paper. Wait 5-10 minutes and double check for any more air bubbles. If there are any, pick it up and try to press them out to the sides by pressing on the paper side. This is also a time to double check the placement of, or make any adjustments to the glass. Then turn all the pieces up-side down so that the glass is down. This will allow the glue to dry through the paper. At this point it will take a while for the glue to dry. I let them dry over night.

FOUR - Take a pair of scissors and cut away the extra paper. Hold the scissors at an angle and cut as you turn the glass the full circle. You will likely be cutting through the excess dried glue as you go. 

FIVE - If you've used magazine clippings or lightweight paper for the background,  glue on an extra piece of paper before super gluing the magnet to ensure the super glue will not show through.

SIX - Apply super glue to the paper and affix a magnet. I use 3/4" ceramic magnets. They will dry within 15 - 20 minutes and you’re all done!

PHOTO Substitutions - The trick to using photos is to first make a color copy of the picture. Photo paper will not allow the glue to dry. Secondly, check to see and make note where the glass will need to be placed on the faces before going on to the glue stage. If a face ends up too close to the edge, it looks oddly distorted.